 Skip to content
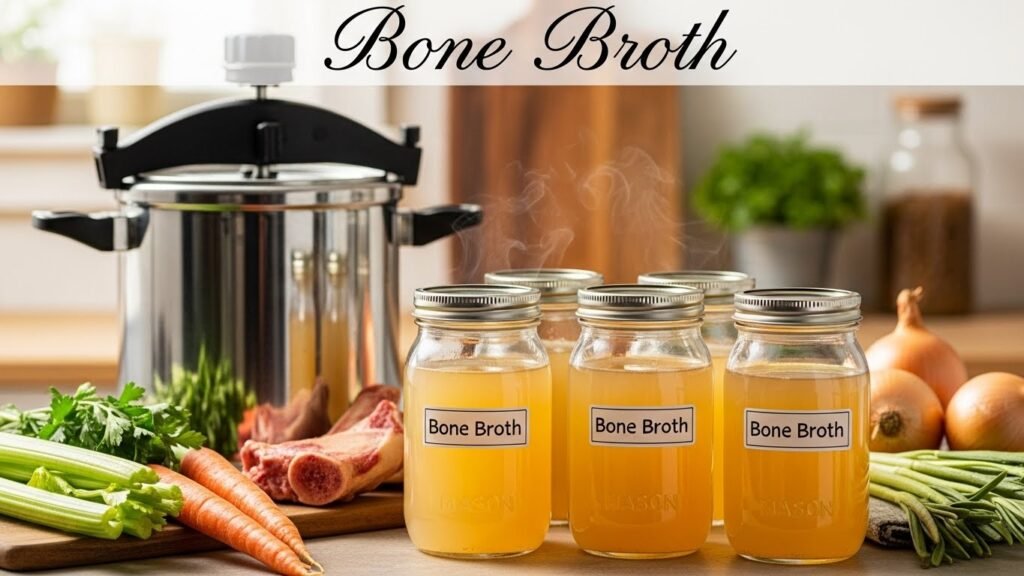
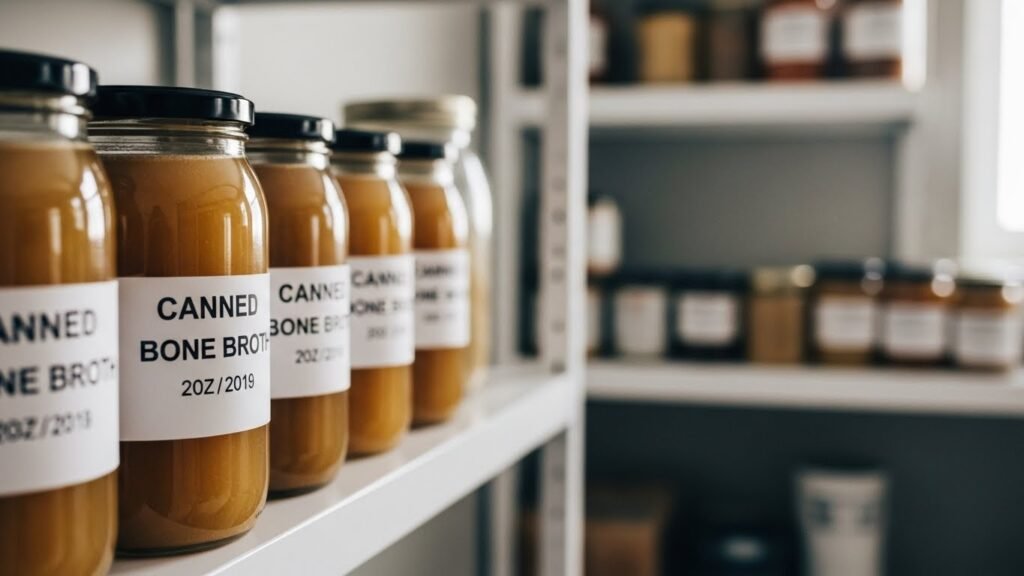
Canning bone broth is a practical and cost-effective way to preserve this nutrient-rich liquid for long-term storage. Bone broth, made by simmering animal bones, collagen, and cartilage, is full of essential minerals, amino acids, and gelatin that benefit your health. Canning allows you to store bone broth for up to 18 months, ensuring a ready supply for soups, stews, sauces, or drinking.
Pressure canning is crucial for meat-based broths, including bone broth. Unlike water bath canning, which is ideal for fruits and jams, pressure canning ensures that bone broth is heated to a safe temperature for long-term storage. In this guide, we will go through the steps, equipment needed, and the science behind safe bone broth canning.
Why You Should Pressure-Can Bone Broth
Pressure canning is the only safe method to preserve meat-based broths, including bone broth. This method uses high pressure to increase the boiling point of water, ensuring that the broth reaches temperatures necessary to kill harmful bacteria, molds, and yeasts.
The process also helps in maintaining the rich flavor and nutrients that make bone broth so beneficial. It provides shelf-stability and allows you to store bone broth for long periods without worrying about spoilage. Additionally, canning large batches saves time, money, and helps reduce food waste by utilizing leftover bones.
Benefits of Pressure Canning for Long-Term Storage
- Long Shelf Life: Canned bone broth can last up to 18 months when stored properly.
- Convenience: Having pre-made bone broth on hand makes meal prep easy.
- Nutrient Preservation: Pressure canning locks in nutrients and flavors that may otherwise be lost in freezing.
- Reduces Waste: Using leftover bones from previous meals maximizes the use of ingredients.
Supplies and Equipment Needed for Canning Bone Broth
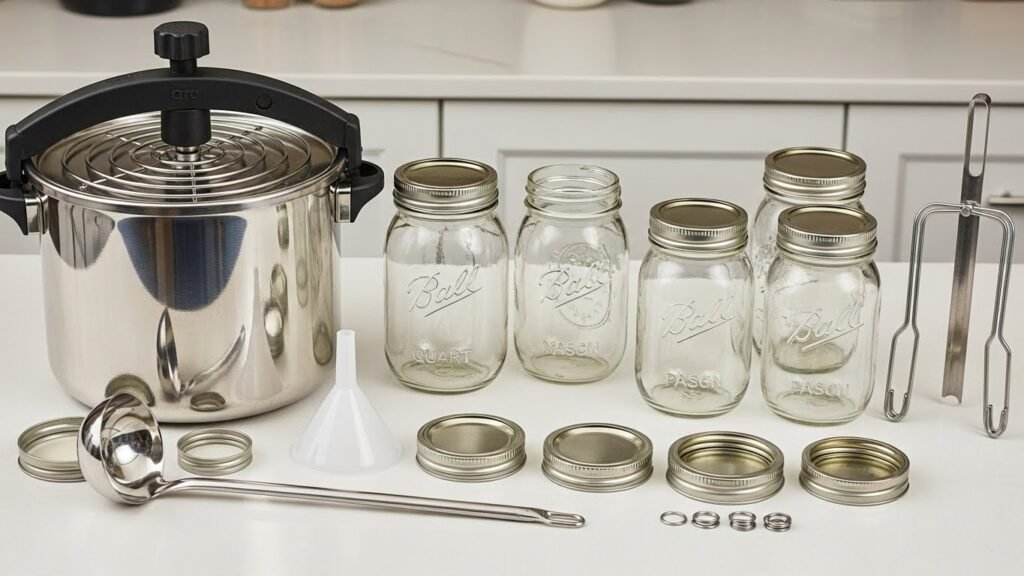
To safely and effectively can bone broth, you will need the following equipment:
- Pressure Canner with Rack: This is essential for safely canning meat-based broths.
- Canning Jars (Pint and Quart Size): Jars that will hold the bone broth during processing.
- Canning Lids and Screw Bands: To seal the jars.
- Funnel and Ladle: For easy pouring of hot broth into jars.
- Jar Lifter: To safely handle hot jars after processing.
- Clean Rag: To wipe jar rims and ensure proper sealing.
Preparation for Canning
Before you start the canning process, make sure your jars are clean and ready for use. You can sterilize the jars in the dishwasher or by boiling them in hot water. Preheat the jars to prevent cracking when filled with hot liquid.
Using new lids is essential to ensure that the jars seal properly. Never reuse canning lids as they may not create a secure seal, which can lead to spoilage.
How to Make Bone Broth (Before Canning)
Ingredients for Bone Broth
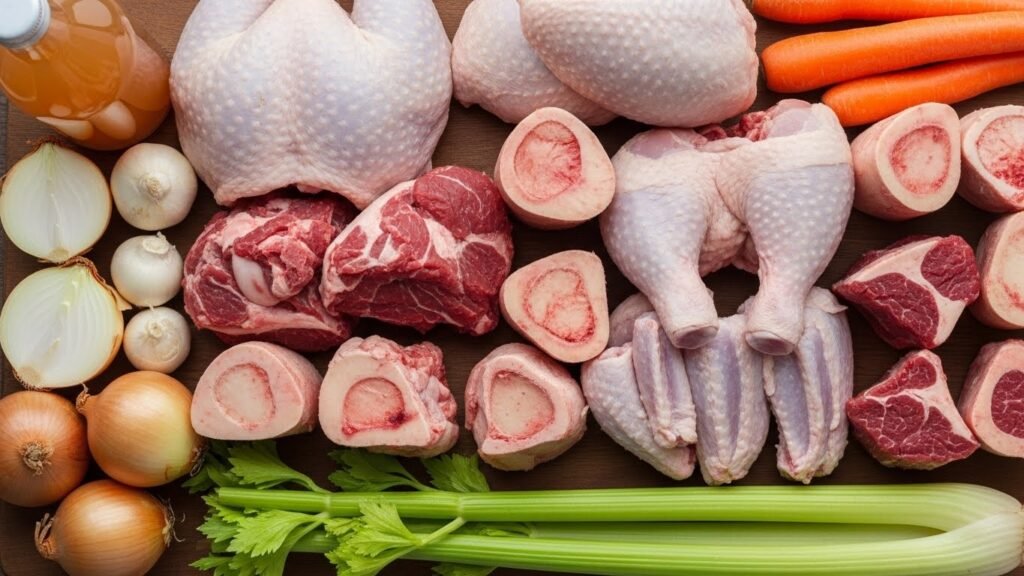
- Bones (chicken, beef, pork, venison, or vegetable scraps)
- Vinegar (apple cider vinegar or white vinegar) – helps draw minerals out of bones
- Optional: Vegetable scraps (carrots, onions, celery)
Cooking Bone Broth
You can make bone broth in a stockpot, crockpot, or pressure cooker. Simmer the bones for several hours to extract nutrients. The simmering time will vary depending on the type of bone:
- Chicken bones: 4-6 hours
- Beef bones: 12-24 hours
Add vinegar at the beginning of the cooking process to help extract collagen and minerals. Once the broth has simmered, strain the solids from the liquid using a fine-mesh strainer or cheesecloth. Skim any fat off the top for a cleaner broth.
Pressure Canning Procedure
Step-by-Step Instructions
- Filling the Pressure Canner with Water: Follow the manufacturer’s instructions for the amount of water needed in your pressure canner.
- Preparing the Jars: Using a funnel and ladle, fill each jar with the hot broth. Leave about an inch of headspace at the top to allow for expansion during the canning process.
- Removing Air Bubbles: Gently tap the jars to remove any air bubbles. You can also use a wooden stick or a chopstick to stir the broth slightly to release the air.
- Wiping Jar Rims: Use a clean rag dipped in vinegar to wipe the rim of the jar to remove any food residue that could interfere with sealing.
- Sealing the Jars: Place the canning lids on top of the jars and tighten the screw bands until they are fingertip tight.
Processing in the Pressure Canner
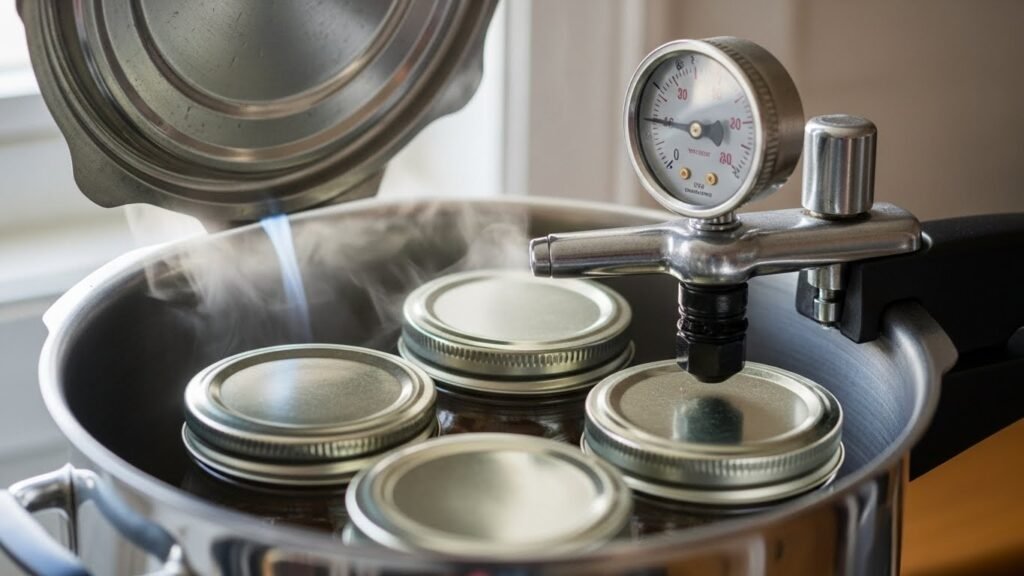
- Placing Jars in the Canner: Load the jars into the pressure canner, ensuring they are arranged without touching each other.
- Vent Steam: Allow steam to escape from the canner for 10 minutes before sealing the vent.
- Adjusting Pressure: Depending on your altitude, adjust the pressure to the appropriate PSI (pounds per square inch). For altitudes up to 1,000 feet, the recommended pressure is 10 pounds. For altitudes above 1,000 feet, use 15 pounds of pressure.
- Processing Time: The processing time for pints is 20 minutes, and for quarts, it is 25 minutes. These times may vary based on the size of the jars and altitude.
- Natural Pressure Release: Once the processing time is complete, allow the canner to cool down naturally before releasing the pressure. This ensures that the jars do not break.
Elevation and Pressure Adjustments
Altitude affects the boiling point of water, so it’s essential to adjust the pressure settings for high altitudes. At elevations above 2,000 feet, increase the pressure to 15 pounds and extend the processing time to ensure proper sterilization.
After Canning: Final Steps and Storage
Cooling and Sealing Jars
Once the processing is complete, let the jars cool undisturbed on a towel for 12-24 hours. Check the seals by pressing down on the center of the lids. If the lid doesn’t pop back, the jar has sealed properly.
Labeling and Storing Jars
After ensuring the jars are sealed, label them with the date and contents. Store the jars in a cool, dark, and dry place, such as a pantry. Properly canned bone broth can be stored for up to 18 months.
Common Issues and How to Handle Them
- Siphoning: This occurs when broth leaks out of the jar during processing. It’s often caused by too much headspace or incorrect sealing. To avoid this, make sure to leave only 1 inch of headspace.
- Improper Seals: If the jars fail to seal, reprocess them or store the unsealed jars in the refrigerator and use them within a few days.
- Fat Floating: If fat rises to the top of the jar during the cooling process, skim it off before reheating or using the broth.
Important Notes for Safe Canning
- Always use a pressure canner for bone broth. Do not attempt to use a water bath canner, as it will not reach the necessary temperatures for meat-based broths.
- Never reuse canning lids to ensure a proper seal.
- Be cautious of under-processing or over-processing the jars, as both can affect the safety and quality of the broth.
How to Use Canned Bone Broth
Once your bone broth is safely canned, it’s time to make the most of it! Canned bone broth is versatile and can be used in various recipes or consumed on its own for its health benefits. Here’s how you can make use of your homemade, shelf-stable bone broth:
Reheating and Incorporating Canned Bone Broth into Recipes
To use canned bone broth, simply open a jar, heat the broth, and incorporate it into your favorite recipes. Whether you’re making a hearty soup, a creamy gravy, or a flavorful sauce, bone broth is a great base for countless dishes. You can reheat it in a pot over medium heat or in the microwave.
Versatile Uses for Canned Bone Broth
- Soups and Stews: Bone broth adds depth and richness to any soup or stew.
- Gravies and Sauces: Use bone broth as a base for homemade gravies or sauces.
- Cooking Grains: Replace water with bone broth when cooking rice, quinoa, or other grains to infuse extra flavor.
- Drinking: Many people enjoy sipping warm bone broth as a nourishing and hydrating drink, especially in colder months.
Using the Canned Broth as a Base for Other Meals
The beauty of bone broth is its versatility. You can add it to almost any dish for extra nutrients and a rich flavor profile. Whether you’re braising meats, cooking vegetables, or making risotto, bone broth is a great addition. It’s also a fantastic base for homemade ramen or pho, where the broth is the star of the dish.
How to Safely Store Canned Bone Broth
Proper storage is key to maintaining the shelf-life and safety of your canned bone broth. After canning, ensure that the jars are stored in the right conditions.
Storing Jars for Long-Term Use
After the jars have sealed and cooled, place them in a cool, dark, and dry location. A pantry or cupboard works well. Avoid places that are prone to temperature fluctuations, such as near windows or in kitchens that are exposed to heat. You should also ensure the storage area is draft-free to prevent any risk of seal failure.
Shelf Life of Canned Bone Broth
When stored properly, canned bone broth can last for up to 18 months. While it’s best to use it within the first 12 months for optimal flavor and nutrition, it remains safe for consumption as long as the seals are intact and the broth hasn’t been compromised in any way.
How to Check if the Bone Broth Has Gone Bad
Before using canned bone broth, always check the jar for signs of spoilage:
- Seals: If the seal is broken or the lid is popped up, discard the jar.
- Smell: If the broth smells rancid or off in any way, do not consume it.
- Color and Texture: If the broth appears discolored or has an unusual texture, it may not be safe to use.
Troubleshooting Canning Issues
While canning bone broth is a simple process, it’s essential to be aware of common issues that may arise during canning and know how to address them.
What to Do if Jars Didn’t Seal Properly
If a jar fails to seal, it can be reprocessed or refrigerated for immediate use. Here’s what to do:
- Reprocess the Jars: If you notice that a jar didn’t seal, you can try reprocessing it. Remove the lid, check the rim for any food debris, wipe the rim, and replace the lid. Then, process the jar in the pressure canner for the appropriate time.
- Refrigerate and Use: If reprocessing isn’t an option, store the jar in the refrigerator and use the broth within a few days.
Dealing with Floating Fat
After the broth cools, fat may float to the top. If you don’t mind the fat, you can leave it as is. However, if you prefer a leaner broth, you can skim the fat off before canning or after opening the jar. Skimming fat not only makes the broth healthier but also helps preserve its quality during storage.
How to Prevent Siphoning
Siphoning occurs when liquid leaks out of the jar during the canning process, often due to too much headspace. To prevent siphoning, always leave about 1 inch of headspace in the jar and avoid over-tightening the lids.
Common Canning Problems and Their Solutions
While pressure canning bone broth is generally straightforward, there are a few problems that may arise:
- Jars Not Sealing: This can happen if the rims of the jars aren’t wiped clean before sealing or if the lids are old or damaged. Always check the seal by pressing down on the lid after cooling.
- Broth Cloudiness: If the broth appears cloudy after canning, it’s usually due to impurities or fine particles in the broth. You can strain the broth more thoroughly before canning to avoid this.
- Cracked Jars: To avoid cracked jars, ensure that the jars are pre-warmed before filling them with hot broth. Sudden temperature changes can cause glass to crack.
Best Practices for Safe and Successful Bone Broth Canning
To ensure the best results when canning bone broth, follow these guidelines:
- Always use a pressure canner, never a water bath canner.
- Never reuse lids to guarantee a proper seal.
- Ensure proper headspace to avoid siphoning.
- Preheat jars to prevent cracking.
- Wipe jar rims with vinegar before sealing.
- Label jars with the date of canning to track freshness.
Advanced Tips for Canning Bone Broth
While basic canning methods are easy to follow, there are some advanced tips and techniques that can help enhance the quality and efficiency of your bone broth canning process. These tips are designed for those who want to perfect their canning skills and make the most out of each batch of broth.
Pre-Canning Broth Enhancements
Before you begin the canning process, consider these enhancements to maximize the flavor and nutrients of your bone broth:
Use of Additional Aromatics
While it’s common to add vegetables like onions, carrots, and celery to your bone broth for extra flavor, you can take it a step further by incorporating herbs and spices such as garlic, thyme, rosemary, and bay leaves. These additions will infuse the broth with even more richness and complexity.
Roasting the Bones
Roasting the bones before simmering them is an excellent way to deepen the flavor of the broth. Simply place the bones in a roasting pan and roast them in the oven at 400°F (200°C) for about 30 minutes. This step brings out the natural flavors and adds a richer color to the broth.
Adding Vinegar at the Right Time
Vinegar is essential for extracting minerals from bones, but adding it at the right time makes a difference. Add vinegar to the pot with the bones before you begin heating them, allowing it to work its magic while the bones are still cold. This helps to draw out the minerals more effectively.
Using Different Types of Bones
Each type of bone offers different benefits to your bone broth. Depending on the desired outcome, you can use various bones to achieve a unique flavor and nutrient profile.
Chicken Bones
Chicken bones, including carcasses, wings, necks, and feet, are rich in gelatin and collagen. They create a delicate, lighter broth that is perfect for drinking or using in lighter soups and sauces.
Beef Bones
Beef bones, such as marrow bones, knuckles, and shanks, provide a deeper, richer flavor and are ideal for creating a hearty, full-bodied broth. Beef bones also contain a significant amount of collagen, making the broth more gelatinous and nourishing.
Pork and Lamb Bones
Pork and lamb bones can also be used for a unique flavor profile. Pork feet, neck bones, and tailbones, as well as lamb shanks, yield a fatty, gelatin-rich broth with a slightly different taste.
Fish Bones
Fish bones can be used for a lighter, more delicate broth. This type of broth is typically used for seafood-based dishes or as a base for making fish soup.
How to Handle Collagen Fatigue
Collagen is one of the key nutrients in bone broth, and it contributes to the broth’s texture and richness. However, it’s important to note that collagen can “fatigue” after prolonged simmering, which means it can lose its ability to create a gelatinous texture.
How to Prevent Collagen Fatigue
To avoid collagen fatigue, try simmering your broth for the recommended amount of time and not much longer. If you notice that the broth has stopped thickening, it may be a sign that the collagen is no longer effectively breaking down. At this point, it’s time to stop the simmering process and proceed with canning.
Using Bone Broth for Pets
Bone broth is not only beneficial for humans but also for pets, especially dogs and cats. The nutrients in bone broth, including collagen and amino acids, can help support joint health, digestion, and skin condition in pets.
How to Make Bone Broth for Pets
If you’re planning to use your homemade bone broth for your pets, ensure that you don’t include any added seasonings, such as salt, garlic, or onions, as they can be harmful to pets. Simply simmer the bones with water and vinegar, strain the liquid, and serve it to your pets. You can freeze it in ice cube trays for easy servings.
Troubleshooting Common Canning Problems
While bone broth canning is straightforward, some issues may arise that require attention. Below are common problems and how to handle them to ensure your broth is safely canned.
Jars Not Sealing Properly
One of the most common issues during canning is when jars do not seal properly. If a jar doesn’t seal, the broth inside can become contaminated, leading to spoilage.
Causes of Poor Seals
- Food Residue on Jar Rim: Always clean the jar rims thoroughly before sealing. Food residue can prevent the lid from sealing properly.
- Incorrect Lid Placement: Ensure that the lid is placed correctly on the jar before tightening the screw band.
- Old Lids: Using reused or old lids can cause poor seals. Always use new lids to guarantee a proper seal.
How to Fix Seals
If a jar doesn’t seal, you can try reprocessing it. Remove the lid, clean the rim, and replace it with a new lid. Reprocess the jar in the pressure canner for the same amount of time.
If reprocessing isn’t an option, refrigerate the jar and use it within a few days.
Siphoning During the Canning Process
Siphoning is when liquid leaks out of the jars during the canning process. This typically occurs when too much headspace is left or when the jars are overfilled.
How to Prevent Siphoning
- Leave Proper Headspace: Always leave about 1 inch of headspace to allow for expansion during processing.
- Don’t Overfill the Jars: Fill the jars carefully, ensuring that the liquid doesn’t spill over the top.
- Tighten the Lids Properly: Tighten the screw bands to fingertip tightness. Over-tightening can lead to siphoning.
Cracked Jars During Canning
Cracked jars can occur if they are exposed to rapid temperature changes, either from hot broth being poured into cold jars or from cooling too quickly after processing.
How to Prevent Cracked Jars
- Preheat the Jars: Preheat your canning jars before filling them with hot broth.
- Cool Jars Slowly: Allow jars to cool undisturbed in a draft-free area. Don’t move them until they’ve cooled completely.
Maintaining the Quality of Canned Bone Broth
To get the best out of your canned bone broth, make sure to store it properly and avoid mistakes during the canning process. Regularly inspect your jars for signs of spoilage and follow the guidelines for proper sealing and storage. Doing so will ensure you can enjoy nutrient-dense, rich bone broth whenever you need it.
Extended Uses for Canned Bone Broth
Canned bone broth isn’t just a convenient ingredient for everyday cooking; it has a wide range of applications beyond soups and stews. Let’s dive into some creative and lesser-known ways to make the most of your canned bone broth.
Bone Broth in Baking
Yes, you can incorporate bone broth into baked goods for added moisture and flavor. The gelatin in bone broth adds a subtle richness to the texture of bread, muffins, and even pizza dough.
Adding Bone Broth to Bread and Pizza Dough
You can substitute part of the water or other liquids in your baking recipes with bone broth. This will enhance the nutritional value of your baked goods and give them a savory flavor. It’s especially useful for adding depth to savory breads, focaccia, or pizza dough.
Bone Broth in Smoothies
Bone broth can be used as a base for smoothies, adding a nutrient-dense twist. You won’t notice the taste as much when blended with fruits, nuts, and seeds.
How to Add Bone Broth to Smoothies
- Fruit-Based Smoothies: Use bone broth as the liquid base and blend with berries, banana, and leafy greens for a savory yet sweet smoothie.
- Savory Smoothies: For a more savory option, combine bone broth with spinach, avocado, cucumber, and a dash of sea salt.
This is an excellent way to sneak extra nutrition into your diet, especially if you’re on the go and need a quick nutrient boost.
Bone Broth as a Protein Supplement
For those who need extra protein, especially athletes or those on specific diets, bone broth is an excellent supplement. It’s high in collagen, which is beneficial for joint health, skin elasticity, and muscle repair.
How to Use Bone Broth for Protein
You can drink bone broth as a protein-packed snack between meals, or add it to protein shakes or smoothies for added benefits. A warm cup of broth before a workout can also help to hydrate and fuel your muscles.
Bone Broth as a Base for Sauces and Gravies
Bone broth is the perfect base for creating rich and flavorful sauces and gravies. Whether you’re making a classic brown gravy, a creamy sauce for pasta, or a tangy barbecue sauce, bone broth can enhance the depth of flavor.
How to Use Bone Broth in Sauces and Gravies
Simply replace the liquid in your sauce recipe with bone broth. You can reduce it to thicken or use it as a base for gravies. The added collagen will give your gravies a silky, smooth texture.
Bone Broth in Rice and Other Grains
Using bone broth instead of water to cook rice or other grains adds an extra layer of flavor. The minerals and gelatin from the broth will infuse the grains, making them more delicious and nutritious.
How to Cook Rice with Bone Broth
- Simple Rice: Use bone broth instead of water to cook white, brown, or wild rice. The rice will absorb the savory flavors of the broth, making it a perfect side dish for meats or vegetables.
- Quinoa, Barley, and Oats: Bone broth works well for cooking other grains, like quinoa, barley, and oats. The broth will add flavor and nutrition, making the grains more hearty.
The Health Benefits of Bone Broth
Bone broth is more than just a flavorful addition to meals—it’s also packed with health benefits. From joint health to gut healing, this nourishing broth has been touted for centuries as a health booster.
Nutritional Benefits of Bone Broth
Bone broth is an excellent source of:
- Collagen: This protein is crucial for maintaining the health of your skin, joints, and connective tissues.
- Gelatin: This is a form of cooked collagen that can help improve digestion and gut health by supporting the mucosal lining of the intestines.
- Amino Acids: Bone broth contains glycine, proline, and glutamine, which help with detoxification, tissue repair, and immune function.
- Minerals: Bone broth is rich in calcium, magnesium, phosphorus, and potassium, which support bone health, heart health, and muscle function.
Bone Broth for Joint Health
Collagen, the primary protein found in bones, cartilage, and tendons, plays a crucial role in supporting joint health. Consuming bone broth regularly helps provide your body with the building blocks it needs to maintain healthy joints and reduce inflammation.
Bone Broth for Gut Health
Bone broth has been praised for its ability to heal and seal the gut lining. The gelatin and amino acids in the broth help reduce inflammation in the digestive tract and support the integrity of the intestinal lining. This makes it particularly beneficial for people with digestive issues such as leaky gut syndrome or IBS (Irritable Bowel Syndrome).
Bone Broth for Skin and Hair Health
Collagen is essential for maintaining healthy skin, and regular consumption of bone broth can promote skin elasticity, reduce wrinkles, and improve overall skin tone. Additionally, the collagen found in bone broth supports hair and nail growth, making it an excellent addition to any beauty regimen.
What to Do If You Have Leftover Bone Broth
If you’ve canned bone broth and find that you have extra left over, don’t throw it away! There are several ways you can repurpose it to avoid wasting it.
Freezing Leftover Bone Broth
If you don’t have enough jars to can all of your bone broth, freezing is a great alternative. Bone broth freezes well and can be stored in airtight containers or ice cube trays for easy portioning. Simply thaw it when you need it.
Use Bone Broth for Meal Prep
If you’re making a large batch of bone broth, consider using some of it for meal prep. Freeze portions that you know you’ll use in the next few weeks, and store the rest in the pantry for long-term use.
Final Tips for Successful Bone Broth Canning
By now, you’ve learned the essential steps and techniques for making and canning bone broth, but there are a few final tips and tricks to help ensure your success.
Ensure Proper Seal and Storage
One of the most important aspects of canning bone broth is ensuring that your jars are sealed properly. Always check the seals before storing the jars and discard any jars that don’t seal correctly. It’s also important to store your canned bone broth in a cool, dark place, away from direct sunlight, to maintain its quality and flavor.
Why Sealing Matters
The primary goal of canning is to create a vacuum-sealed environment to prevent bacteria and other microorganisms from contaminating the contents. If the seal is not tight, there is a risk of spoilage and foodborne illness. Always test your seals by pressing down on the center of the lid. If it doesn’t pop back, the jar has sealed successfully.
Don’t Overprocess the Jars
It’s easy to assume that the longer you process the jars, the better the results. However, overprocessing can lead to the breakdown of nutrients, especially the delicate collagen. Stick to the recommended processing times—20 minutes for pint jars and 25 minutes for quart jars—so that you preserve the quality of your broth without losing too many nutrients.
Troubleshooting Common Issues with Bone Broth Canning
If you encounter any issues during the canning process, it’s important to troubleshoot them carefully to ensure your bone broth is safe for long-term storage. Here are a few solutions to common canning problems:
- Jars Not Sealing: If your jars didn’t seal, reprocess them or refrigerate and use them within a few days. Always make sure the jar rims are clean before sealing, and ensure that lids are in good condition.
- Siphoning: This occurs when broth leaks out of the jars. To prevent this, ensure you leave the proper headspace and don’t overfill the jars.
- Fat Floating in Broth: Fat rising to the top of the jar is normal but can be skimmed off for a leaner broth. It’s also a good idea to remove as much fat as possible before canning to ensure a cleaner broth.
Tips for Using Leftover Broth
Even if you’re canning large batches of bone broth, you might have some leftover that doesn’t fit in the jars. Here’s what you can do with it:
- Freeze the Leftovers: Pour any leftover bone broth into ice cube trays for portioned servings, or store it in freezer-safe containers for later use. Bone broth can be frozen for up to 6 months.
- Repurpose for Other Meals: If you’re not ready to can more broth, use any leftover liquid to make gravies, soups, or to cook grains like rice and quinoa.
How to Ensure Your Bone Broth Stays Shelf-Stable
Once your bone broth is safely canned, it’s essential to keep it in the right conditions to ensure it remains shelf-stable.
Storing Canned Bone Broth
Store your canned jars in a cool, dry, and dark location, such as a pantry or cupboard. Ideal storage conditions ensure that your bone broth remains safe for consumption for up to 18 months. Always label the jars with the date of canning so you know when to use them.
Checking for Signs of Spoilage
Before using any jar of canned bone broth, make sure it hasn’t gone bad. Check for:
- The Seal: Ensure the lid is tight and hasn’t been compromised.
- The Broth: Check for any changes in the color, texture, or smell. If it smells sour or rancid, discard it.
How to Extend the Shelf Life
To maximize the shelf life of your canned bone broth, keep it in a dry, cool, and dark place. Exposure to light and fluctuating temperatures can cause the broth to spoil faster. Additionally, if you plan on consuming the broth within a few months, freezing it in smaller portions might be more efficient than canning.
The Final Word: Canning Bone Broth for Long-Term Storage
Canning bone broth is an excellent way to preserve a nutrient-dense, flavorful liquid that can be used in a wide variety of recipes. By following proper canning procedures and taking care to use the best ingredients, you can create bone broth that’s safe, shelf-stable, and packed with nutrients.
With a little practice, you’ll become an expert at canning bone broth, providing your family with a reliable source of nutrients for months to come. Whether you’re making chicken, beef, or vegetable-based broth, the pressure canning method ensures that your broth stays fresh, safe, and ready for use in all your favorite dishes.
FAQs
Can I can bone broth without using a pressure canner?
No, you must use a pressure canner for canning bone broth because it is a meat-based broth. A water bath canner won’t reach the necessary temperatures to safely preserve meat broths. Using a pressure canner ensures that harmful bacteria are killed during the process.
Can I use frozen bones for making bone broth to can?
Yes, you can use frozen bones for making bone broth. However, it’s best to thaw them before cooking to ensure even heat distribution. If you’re using frozen bones, ensure they are cooked thoroughly to extract maximum nutrients before canning.
How long does it take to can bone broth in a pressure canner?
The processing time for bone broth in a pressure canner is 20 minutes for pint jars and 25 minutes for quart jars at 10 pounds of pressure. The time may vary depending on your altitude, so make sure to adjust accordingly.
What is the best way to store canned bone broth after processing?
Store your canned bone broth in a cool, dark, and dry place, such as a pantry. The ideal temperature for storage is between 50°F and 70°F. Make sure the jars are away from direct sunlight or heat sources.
Can I can bone broth in glass jars that are not specifically for canning?
It is best to use jars designed specifically for canning, such as mason jars, as they are built to withstand the high pressure of canning. Non-canning glass jars may crack or break during the canning process.
Can I add salt or seasoning to the bone broth before canning?
It’s recommended to avoid adding salt or heavy seasonings to bone broth before canning. Salt can interfere with the sealing process and may make the broth too salty once it is reheated. You can add seasoning when you use the broth later in recipes.
Can I can bone broth in a slow cooker or crockpot?
While you can use a slow cooker to make bone broth, you cannot use it to can the broth. Canning requires a pressure canner to achieve the necessary temperature for safe storage. Slow cookers are only used for cooking, not canning.
How can I prevent the fat from floating in the jar?
Fat floating on top of the broth during the canning process is normal, but you can skim off the fat before canning or after opening the jar. This will result in a leaner broth and a cleaner look in the jars.
Can I can bone broth made from poultry, beef, or pork bones the same way?
Yes, you can can bone broth made from different types of animal bones, including poultry, beef, and pork. Each type of bone may offer a different flavor and texture, but the canning process is the same for all of them.
Can I use bone broth for baby food or when introducing solids to infants?
Bone broth can be an excellent addition to a baby’s diet once they are ready for solids, as it is full of nutrients like collagen and amino acids. However, make sure to use low-sodium or unsalted bone broth to avoid excess sodium intake.
How can I make sure my bone broth is nutrient-rich after canning?
To maximize the nutrients in your bone broth, use high-quality bones, such as joint bones, feet, and marrow bones, which contain the most collagen. Be sure to simmer the broth for a long time (12-24 hours) to extract as many minerals and nutrients as possible.