 Skip to content
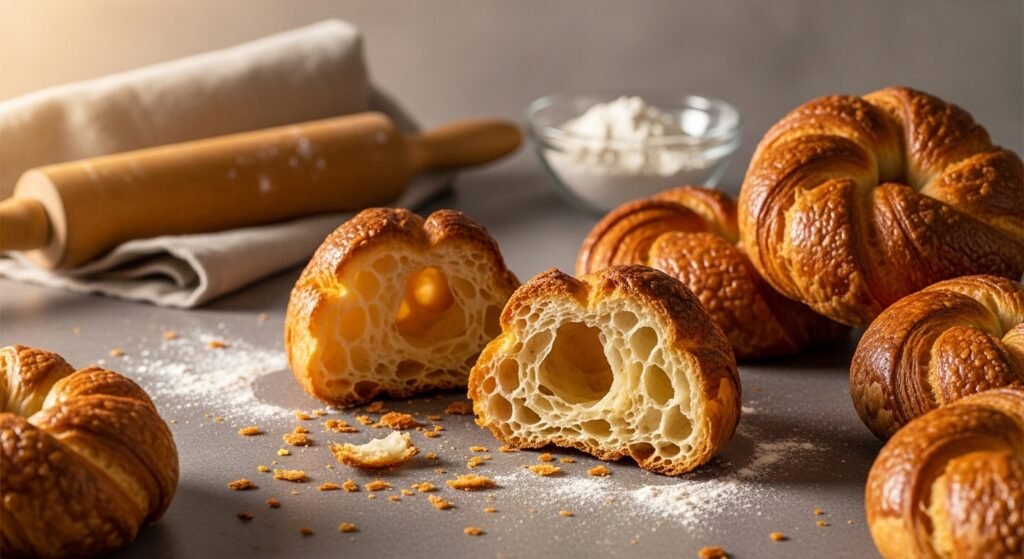
If you love buttery rolls, this gipfeli recipe will change your life. Most people think these are just French croissants. They look similar, but the vibe is totally different. This Swiss classic is the king of the breakfast table. It has more layers and a tighter roll than its French cousin. You get a pastry that is crisp on the outside but super soft inside. This guide will show you how to nail this at home. You do not need to be a pro baker to do this. We will walk through every step together like best friends. Get your rolling pin ready for some serious kitchen magic.
Understanding the Swiss Gipfeli
You might wonder what makes this pastry so special in Switzerland. It is more than just a morning snack for the locals. It represents a long tradition of high-quality alpine baking. These rolls are everywhere from Zurich to the smallest mountain villages.
Defining the Gipfeli
A gipfeli is a crescent-shaped roll made from laminated dough. The word itself comes from the German word for peak or summit. This name fits perfectly because they look like little mountain tops. They are the go-to choice for a quick morning meal. You will find them in every single bakery across the Swiss cantons. They are designed to be sturdy enough for dipping in coffee.
Gipfeli vs. French Croissant
Many people assume these two pastries are the exact same thing. While they share a similar look, the texture is quite unique.
- Butter Content: French croissants usually have a higher fat ratio for a greasy feel.
- Sweetness: This gipfeli recipe uses a bit more sugar for a sweet dough.
- The Roll: Swiss bakers roll the dough much tighter than the French do.
- The Crumb: The inside of a gipfeli is more like bread and less like air.
The Swiss Character
The real magic is in the science of the dough structure. A great gipfeli has a very defined honeycomb look when you cut it. It feels milky and rich because of the specific hydration levels used. The tight curl creates many thin layers that shatter when you bite. It is a satisfying crunch followed by a tender chew. This balance is what makes people fall in love with them.
Essential Ingredients for Success
You cannot make world-class pastry with low-quality items from the back of the pantry. The best gipfeli recipe starts with the best raw materials. Pick items that are fresh and high in quality. This makes the lamination process much easier for you.
The Dough Components (Base)
The base dough is called the detrempe by professional pastry chefs. It needs to be strong but also very stretchy for the folds.
- High-Protein Bread Flour: Use 500g or about 3 ¼ cups of sifted flour.
- Milk: You need 250ml or ½ cup of milk to keep the dough rich.
- Granulated Sugar: Add 50g or ¼ cup to feed the yeast and add flavor.
- Yeast: Use 7g of active dry yeast or 1 tablespoon of fresh yeast.
- Fine Sea Salt: Exactly 1 teaspoon is needed to control the rise.
- Water: Keep ¼ cup handy to adjust how sticky the dough feels.
The Lamination Essentials
Lamination is just a fancy word for putting butter inside dough layers. This is what creates the flaky “scales” on the finished pastry.
- European-Style Butter: Use 250g or ½ cup of high-fat unsalted butter.
- Dusting Flour: Keep extra bread flour nearby to stop the dough from tearing.
Finishing Touches
The final look of your pastry depends on how you finish it. These small additions provide the professional shine you see in shop windows.
- Egg Wash: One large beaten egg creates a deep golden color.
- Salt: A tiny pinch in the egg wash breaks down the proteins for shine.
- Water Mist: A light spray of water creates steam for a crispy crust.
Essential Kitchen Equipment

Having the right tools makes this job much faster and less messy. You do not need a commercial kitchen to succeed with this gipfeli recipe. Just a few basics will get the job done right.
- Kitchen Scale: Precision is key so please weigh your ingredients in grams.
- Rolling Pin: A heavy French-style pin is best for even pressure.
- Pastry Cutter: A pizza wheel or sharp knife ensures clean cuts.
- Baking Sheets: Use heavy-duty pans that will not warp in a hot oven.
- Spray Bottle: A clean bottle for misting water is a secret weapon.
- Bench Scraper: This helps you move the dough without using your warm hands.
Preparing the Primary Dough (Détrempe)
Now we get into the actual work of making the dough. This stage is all about building a foundation for the butter. Take your time and do not rush the cooling steps.
Yeast Activation
Yeast is a living thing and it needs a warm hug to start working. If your yeast is dead your pastries will be like flat rocks.
- Warmth: Mix your milk and water until they feel like a warm bath.
- Feeding: Add a pinch of sugar to the liquid to give the yeast energy.
- Waiting: Let it sit for ten minutes until it looks like foamy beer.
Mixing and Kneading
Mixing is where the dry flour turns into a stretchy dough. You are looking for a smooth texture that does not stick to the bowl.
- The Well: Make a hole in the flour and pour the liquid in slowly.
- Gluten: Knead the dough for five minutes to develop the protein strands.
- The Windowpane: The dough should be thin enough to see light through it.
The Initial Rest
Resting the dough is the most important part of the whole process. If the dough is angry and tight you cannot roll it out.
- Chilling: Put the dough in the fridge for at least 1 to 4 hours.
- Fermentation: Cold air slows down the yeast but builds a better flavor.
- Plastic Wrap: Cover it tightly so a dry skin does not form on top.
The Art of Lamination: Creating the Layers
This is the part that scares most home bakers but it is actually fun. Lamination is just folding dough like a piece of paper. You are creating dozens of layers of butter and flour.
Preparing the Butter Block

Your butter needs to be the same firmness as your dough. If the butter is too hard it will break the dough. If it is too soft it will just soak in.
- Flattening: Whack the cold butter with your rolling pin to make a square.
- Consistency: The butter should bend like plastic without snapping.
- Chilling: Keep it in the fridge until the very second you need it.
Folding and Turning

Each fold multiplies the layers you have already created. This is what makes the gipfeli recipe results look so professional.
- The Envelop: Place the butter block on the dough and fold the edges over.
- The Triple Fold: Fold the dough into thirds like a letter for the mailbox.
- The Turn: Rotate the dough 90 degrees before you roll it out again.
- The 30-Minute Rule: You must rest the dough in the fridge between every single fold.
Shaping the Authentic Gipfeli
Once your layers are set you get to shape the crescents. This is where your kitchen starts to look like a real Swiss bakery.

Cutting the Triangles
Use a ruler to make sure every pastry is the same size. This helps them all bake at the same speed in the oven.
- Thickness: Roll the cold dough until it is exactly 4mm thick.
- Width: Cut the base of your triangles to be about 4 inches wide.
- Length: Make them long and skinny so you get more rotations when rolling.
The Rolling Technique
Rolling the dough tightly is the signature move for a Swiss baker. This creates the dense but tender heart of the pastry.
- The Stretch: Give the tip of the triangle a gentle pull to lengthen it.
- The Tuck: Start at the wide end and roll toward the point very firmly.
- The Tail: Always make sure the point of the dough is on the bottom.
The Crescent Curve
A gipfeli is not straight like some modern French croissants. It needs that classic moon shape to be authentic.
- The Bend: Gently pull the two ends toward you to make a C-shape.
- Spacing: Leave plenty of room on the tray because they will grow a lot.
The Critical Proofing Stage
Proofing is the final rise before the heat hits the dough. This is when the yeast creates the air pockets for the honeycomb.
- Warmth: Find a spot in your house that is about 75 degrees Fahrenheit.
- Moisture: Cover the tray with a damp towel to keep the air humid.
- The Poke Test: Gently press the dough with a finger to see if it bounces back.
- Time: Expect this to take about 60 minutes for the best results.
Baking to Perfection
The oven is where all your hard work finally pays off. You want a high heat to puff the layers quickly before the butter melts.
Oven Preparation
Preheat your oven for at least 30 minutes before you start. A cold oven will ruin the lamination you worked so hard on.
- Temperature: Set your dial to 200°C or 400°F for a strong start.
- Steam: Put a pan of hot water on the bottom rack for extra moisture.
The Baking Window
Watch the oven closely during the last five minutes of baking. Every oven is a little bit different and you do not want a burn.
- Egg Wash: Brush the dough twice for an extra dark and shiny crust.
- The Finish: They should look like polished mahogany when they are done.
- The Rack: Move them to a wire rack immediately so the bottoms stay crisp.
Professional Secrets and Variations
Once you master the basic gipfeli recipe you can get creative. Swiss bakeries offer many different versions of this classic pastry.
Clara’s Zurich Secret
Old school bakers sometimes use herbs to add a hidden layer of flavor. It makes the pastry smell like a garden in the morning.
- Thyme: Add fresh thyme leaves to your butter block for an earthy scent.
- Sage: Use sage if you are planning to serve these with salty cheese.
Sweet and Savory Variations

You can fill the centers with almost anything you like. Just make sure the fillings are not too wet or they will ruin the dough.
- Mandelgipfel: Fill with almond paste and top with sliced nuts.
- Schoggigipfeli: Use high-quality dark chocolate sticks in the center.
- Ham and Cheese: Roll a slice of Swiss cheese and ham inside for lunch.
Troubleshooting and Storage
Even pros have bad days in the kitchen sometimes. Knowing how to fix mistakes is what makes you a better baker.
Common Pitfalls

If your pastries look a bit wonky do not worry about it. Most mistakes still taste delicious with a bit of butter.
- Butter Leak: If butter pools on the tray your dough was too warm.
- No Layers: This happens if you roll the dough too hard and crush the butter.
- Doughy Center: You likely took them out of the oven too early.
Storage and Make-Ahead Tips
Fresh gipfeli are best within two hours of leaving the oven. However you can save them for later if you follow these rules.
- Room Temp: Store them in a paper bag for up to two days.
- Freezing: You can freeze shaped raw dough for up to one month.
- Reheating: Always use a toaster oven to get that crunch back.
| Ingredient | Metric Quantity | Imperial Quantity |
| Flour | 500g | 3 1/4 Cups |
| Milk | 250ml | 1/2 Cup |
| Butter | 250g | 1/2 Cup |
| Sugar | 50g | 1/4 Cup |
| Yeast | 7g | 1 Tablespoon |
| Salt | 5g | 1 Teaspoon |
Making this gipfeli recipe is a labor of love. It takes time but the smell in your house is worth it. You will feel so proud when you pull those golden crescents out of the oven. Share them with your family or enjoy one alone with a hot cup of coffee. You have officially mastered the art of the Swiss bakery!
FAQs
Can I make the gipfeli dough in a bread machine?
You can use the dough cycle of a bread machine to handle the initial mixing and kneading of the detrempe. However, you must remove the dough before the heating cycle begins, as the dough needs to remain cold for the lamination process. Once the machine finishes kneading, wrap the dough and move it to the refrigerator to chill.
What is the best way to clean flour and butter off my wooden rolling pin?
Never soak a wooden rolling pin in water as it can warp or crack the wood. Use a bench scraper to gently scrape off any stuck-on dough or butter bits. Wipe it down with a damp cloth and a drop of mild dish soap, then dry it immediately with a clean towel.
Why do some gipfeli recipes call for a sourdough starter?
Some traditional Swiss bakers use a small amount of sourdough discard alongside commercial yeast to improve the shelf life and complexity of the flavor. This provides a slight tang that cuts through the richness of the European butter, though it is not necessary for a standard authentic gipfeli.
Can I use a convection oven for baking these pastries?
Yes, convection ovens are excellent for gipfeli because the fan circulates hot air, ensuring even browning and a superior puff. If using convection, reduce the temperature by about 25°F (15°C) and check the pastries five minutes earlier than the recipe suggests to prevent over-browning.
How do I prevent the tips of the crescents from unrolling during baking?
The key is to ensure the pointed “tail” of the triangle is tucked directly underneath the body of the roll. The weight of the pastry sitting on the tip prevents it from springing open as the steam expands the layers in the oven.
Is it possible to use margarine instead of butter for a vegan version?
While technically possible, margarine has a much lower melting point and a different water content than European butter. This usually results in a greasy texture rather than distinct, shatteringly crisp layers. For the best results, stick to high-fat butter.
Why does my dough keep shrinking back when I try to roll it?
This is caused by gluten tension. If the dough resists your rolling pin, it means the protein strands are too tight. Stop immediately, cover the dough, and let it rest in the fridge for 15 to 20 minutes to allow the gluten to relax before trying again.
What happens if I forget to sift the bread flour?
Sifting removes lumps and aerates the flour, which helps it incorporate more smoothly into the liquid. If you skip this, you might end up with small pockets of dry flour in your dough that can cause tears during the lamination stage.
Can I add seeds like poppy or sesame to the outside?
Yes, adding seeds is very common in Switzerland for savory gipfeli. Brush the pastries with egg wash first, then sprinkle the seeds on top so they stick. Poppy seeds, sesame seeds, or even a light dusting of coarse sea salt work perfectly.
How do I know if my oven temperature is actually accurate?
Many home ovens are off by 10 to 20 degrees. It is highly recommended to use a standalone oven thermometer. Since gipfeli rely on a specific heat “shock” to rise, knowing the exact temperature is vital for success.
Can I use honey instead of granulated sugar in the dough?
Honey can be used, but keep in mind that honey is a humectant and will make the interior of the pastry much softer and more moist. It also browns much faster than granulated sugar, so you may need to tent the pastries with foil halfway through baking.
What should I do if my kitchen is very hot while I am laminating?
High ambient temperatures are the enemy of laminated dough. If your kitchen is over 75°F, turn on the air conditioning or work on a chilled marble slab. You may also need to increase the fridge rest time to 45 minutes instead of 30.
Why do some recipes suggest a “double fold” instead of a “triple fold”?
A double fold, also known as a book fold, creates more layers in a single turn than a triple fold. While more efficient, it can be harder for beginners to manage without the butter breaking. Most home bakers find the triple fold more reliable.
Can I make giant-sized gipfeli for a showstopper breakfast?
You can increase the size of the triangles, but you must lower the oven temperature slightly and increase the baking time. Large pastries take longer for the heat to reach the center, and you don’t want the outside to burn while the inside remains raw.
How do I achieve the “shining” finish seen in professional photos?
Professional bakers often use a “double wash” technique. Brush the shaped dough with egg wash before the final proof, then brush it a second time right before it goes into the oven. This creates a thick, lacquer-like shine.
What is the difference between fresh yeast and instant dry yeast?
Fresh yeast is moist and comes in blocks; it has a shorter shelf life but offers a more traditional “bakery” aroma. Instant yeast is more concentrated and can be mixed directly with dry ingredients, whereas fresh yeast must be dissolved in liquid first.
Can I use a food processor to mix the dough?
You can use a food processor to bring the ingredients together, but be very careful not to over-process. The friction of the blades creates heat, which can warm up the dough too much before the first rest. Pulse only until a ball forms.
Why is sea salt preferred over table salt?
Table salt often contains anti-caking agents and iodine, which can sometimes leave a metallic aftertaste in delicate pastries. Fine sea salt provides a cleaner flavor profile that complements the high-quality butter.
Is it okay to use a silicone baking mat instead of parchment paper?
Silicone mats are fine for baking, but they can sometimes cause the bottoms of the pastries to be less crisp than parchment paper. Parchment allows for better airflow and heat transfer from the metal tray.
How can I tell if my gipfeli are under-baked without cutting them?
Pick one up and check the weight; a fully baked pastry should feel surprisingly light for its size because the water has evaporated. You can also gently tap the bottom; it should sound hollow and feel firm to the touch.