Skip to content
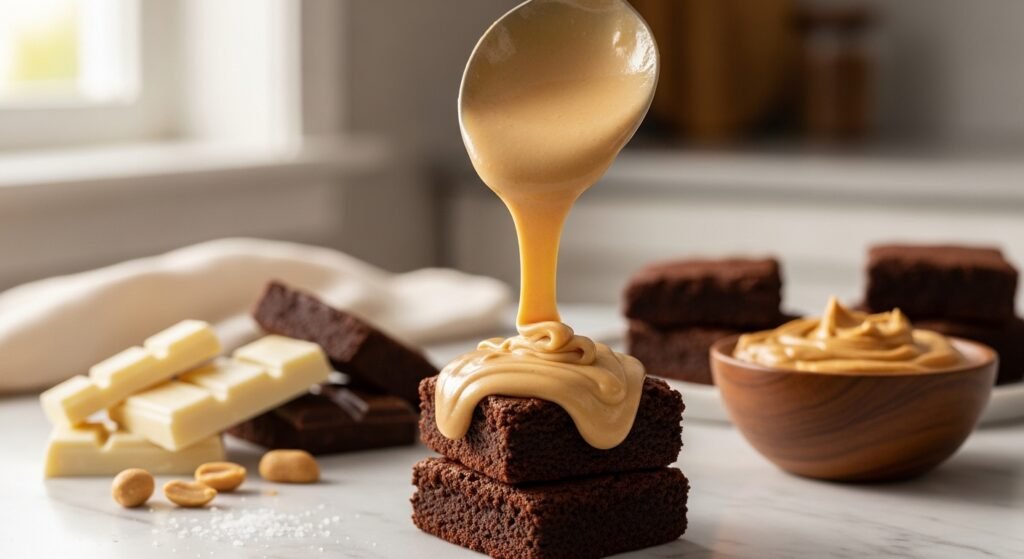
Peanut butter ganache is a total game-changer for anyone who loves baking. It is a silky-smooth mix that tastes like a dream. You only need three basic ingredients to make it happen. It is rich, creamy, and works with almost any dessert. Whether you are a pro or just starting, this guide has your back. We are going to dive deep into every single detail. Get ready to level up your kitchen skills right now. This is going to be the most delicious journey ever.
Introduction to Peanut Butter Ganache
Peanut butter ganache is basically a fancy way of saying melted chocolate mixed with cream and peanut butter. It creates a texture that is super smooth and glossy. It is a 3-ingredient dessert staple that every baker should know by heart. You can use it in so many different ways. It works as a filling, a dip, or even a frosting. The best part is how easy it is to whip up.
Bakers love this recipe because it is simple, stable, and stays perfectly in place on any cake. It offers a familiar, beloved flavor that achieves the ultimate balance between salty and sweet. By combining rich chocolate with nutty peanut butter, you create a decadent treat that everyone recognizes and enjoys.
In the world of modern pastry, this ganache plays a huge role. It is used to fill delicate macarons and big birthday cakes. You can also thin it out to make those trendy drips on the side of a cake. It can even be whipped up to make a fluffy frosting. It is truly a versatile tool for any dessert lover. Once you master it, you will use it all the time.
Why You Will Love This Peanut Butter Ganache
You are going to fall in love with this recipe for many reasons. First, it requires only three basic pantry staples. You probably already have them in your kitchen right now. There is no need for a massive grocery run. It keeps things cheap and easy for everyone. You will save time and money while making something gourmet.
Another reason to love it is the superior stability. This ganache is engineered to be firm enough for cake filling. It will not squish out when you stack your cake layers. At the same time, it remains incredibly creamy in your mouth. It gives you that professional look without the stress. It is a win-win for any home baker.
The flavor profile is absolutely top-notch. It is a perfect balance of salty peanut butter and sweet white chocolate. The saltiness cuts through the sugar so it is not too sweet. It tastes like a high-end candy bar but better. Your friends and family will think you spent hours on it. In reality, it takes just a few minutes of work.
One of the coolest things is the customizable texture. You can change how it feels by slightly tweaking the steps. If you want it runny, you use it while it is warm. If you want it thick, you let it chill in the fridge. You can even whip air into it for a light finish. It adapts to whatever your pastry needs are at the moment.
Essential Ingredients
To get the best peanut butter ganache, you need the right stuff. Using a kitchen scale is the smartest way to measure everything. It ensures that your ratios are perfect every single time. Measuring by weight is much more accurate than using cups. This will help your ganache set up exactly how it should. Let’s look at what you need for this recipe.

White Chocolate Selection
The white chocolate is the base of your ganache. You want to pick something that tastes good on its own. If the chocolate is low quality, the ganache will not be great. Aim for at least 24% cocoa butter for the best results. This ensures a smooth melt and a rich flavor. Do not settle for the cheap stuff if you want a professional finish.
- Exact Quantity. You should use 175g (approx. 1 cup) for a sweeter finish.
- Balance. You can use 150g if you want a more balanced chocolate-to-nut ratio.
- Quality Types. Use high-quality white chocolate bars, couverture, or chunks.
- Avoid Poor Chips. Stay away from low-quality chips that do not melt well.
- Premium Brands. Choose brands like Ghirardelli, Guittard, or 365 for the best melt.
Peanut Butter Varieties
The peanut butter you choose changes the whole vibe of the ganache. Most people prefer a smooth finish, but some like a little crunch. It is important to think about what you are making. A drip cake needs a very smooth peanut butter ganache. A cupcake filling can handle some texture if you want it.
- Exact Quantity. Use 125g (1/2 cup) for a high-intensity peanut flavor.
- Subtle Hint. You can use as little as 40g for just a tiny hint of nuttiness.
- Shelf-Stable Choice. Use brands like Jif or Skippy to prevent the ganache from breaking.
- Natural Option. Use 100% natural, unsweetened peanut butter for a deeper, less sweet taste.
- Texture Choice. Use creamy for drips and chunky for fun cupcake interiors.
Heavy Cream Requirements
The cream is what makes everything come together. You cannot just use any milk from the fridge. You need the fat to create that thick and stable structure. Without enough fat, your ganache will be watery and sad. Make sure you check the label before you start mixing.
- Exact Quantity. Use 160g (2/3 cup) or 150ml depending on your desired thickness.
- Fat Content. Ensure your cream has 34-36% fat for the best emulsion stability.
- Avoid Substitutes. Do not use milk or half-and-half as they lack the needed fat.
- Temperature. Having the cream at room temperature can help it mix better with the chocolate.
Step-by-Step Preparation Guide
Making peanut butter ganache is pretty straightforward if you follow the steps. You want to take your time and not rush the process. If you go too fast, you might burn the chocolate. If you go too slow, it might not mix well. Just follow along, and you will have a perfect bowl of goodness.
Preparing the Base
First things first, you need to get your chocolate ready. If you have a big bar, you need to chop it up. Smaller pieces melt much faster and more evenly. If you use big chunks, the middle might stay hard while the outside burns. Once it is chopped, put it in a bowl with your peanut butter.
- Chop Finely. Finely chopping the white chocolate ensures it melts without any lumps.
- Select Bowl. Use a heat-proof or microwave-safe glass bowl for the ingredients.
- Combine. Place the chopped chocolate and peanut butter together in the bowl first.
Heating and Mixing Methods
Now it is time to get things hot. You have two main ways to heat your cream. You can use the microwave or the stovetop. Both work great, so just pick what is easiest for you. The goal is to get the cream just to the point of bubbling.
- Microwave Method. Heat the cream in 15-second intervals until it starts to bubble.
- Stovetop Method. Simmer cream and peanut butter in a saucepan to incorporate them fully.
- The Pour. Pour the hot liquid over the chocolate and make sure it is all submerged.
- Resting Period. Let the mixture sit for 2-3 minutes to let the heat do the work.
Achieving the Perfect Emulsion

The emulsion is when the fat and water in the ingredients bond together. This is what makes the ganache look shiny and smooth. You want to stir gently at first so you do not splash. Once it starts coming together, you can be a bit more firm. This is the most satisfying part of the whole process.
- Hand Stirring. Use a spoon or rubber spatula to gently combine everything until smooth.
- The Pro Tool. Use an immersion blender for a professional, silky-smooth finish.
- Fix Lumps. If bits remain, microwave for 10-15 seconds and stir again.
- Consistency Check. The ganache should look glossy and have no visible streaks.
Setting and Chilling Techniques
Once your peanut butter ganache is mixed, it needs time to rest. You cannot use it right away if you want it to be thick. The cooling process is where the magic happens. It goes from a liquid to a firm, pipeable cream. You just need a little bit of patience during this stage.
Preventing Surface Skin

If you just leave the bowl on the counter, a skin will form. This skin is chewy and will create lumps in your frosting. Nobody wants a lumpy cake filling. There is a simple trick to keep it perfectly smooth. It only takes a second to do.
- The Flush Method. Press plastic wrap directly against the surface of the ganache.
- Critical Step. This prevents a skin from forming and keeps the texture consistent.
- Cover Fully. Make sure the edges are sealed so no air gets in.
Chill Time Requirements
The fridge is your best friend for setting ganache. However, you cannot rush it too much. If you try to use it too early, it will be too runny. If you leave it too long, it might get as hard as a rock. Knowing the right timing is key to success.
- Quick Set. Give it a minimum of 2 hours if you are in a big hurry.
- Maximum Stability. Let it chill for 6 hours or overnight for the best results.
- Check Texture. It should be thick enough to hold its shape on a spoon.
Thawing and Softening
Sometimes the ganache gets a little too cold in the fridge. If it is too hard to pipe, do not panic. You can easily bring it back to life. You just need to be gentle with it. Never try to melt it quickly if you want to pipe it.
- Room Temperature. Let the bowl sit on the counter to soften naturally.
- Manual Softening. Mix it with a rubber spatula to help it reach a pipeable consistency.
- Avoid High Heat. Do not microwave it for long if you want to keep the thick structure.
Substitutions and Dietary Swaps
Not everyone can eat dairy, and that is totally okay. You can still enjoy amazing peanut butter ganache with a few changes. The world of plant-based baking has come a long way. You can make swaps that still taste incredible. Here is how you can mix things up.
Dairy-Free and Vegan Alternatives
Making this vegan is actually pretty simple. You just need to find the right cream replacement. Coconut cream is the best choice because of its high fat content. It mimics the texture of heavy cream almost perfectly. You also need to check your chocolate.
- Coconut Cream. Use full-fat coconut cream instead of heavy whipping cream.
- Vegan Chocolate. Choose vegan-certified white chocolate for the base.
- Peanut Butter Check. Ensure your peanut butter does not have any hidden dairy.
Chocolate Variations
If you are not a fan of white chocolate, you can change it. Some people prefer a darker, more intense flavor. However, dark chocolate behaves differently than white chocolate. You will need to adjust your ratios to make sure it sets. It is a fun way to experiment.
- Dark Chocolate. Reduce the liquid content if using bittersweet or dark chocolate.
- Cocoa Butter. Understand that higher cocoa butter means a firmer set.
- Flavor Profiles. Dark chocolate pairs perfectly with salty peanut butter for a Reese’s vibe.
Tips for Making the Best Peanut Butter Ganache
To really master this, you need to know the inside secrets. These small tips make a huge difference in the final product. Even a small mistake can change how your ganache turns out. If you follow these pro tips, you will be ahead of the game. Let’s look at what matters most.
- Precision Weighing. Always use a kitchen scale for the most accurate results.
- Temperature Control. Make your ganache early so it has plenty of time to set.
- Quality Ingredients. High-quality chocolate makes the mouthfeel much better.
- Emulsion Stability. Avoid natural peanut butters that separate to prevent a broken sauce.
- Immersion Blender. This tool is the secret to a professional, silky-smooth finish.
Advanced Techniques and Variations
Once you have the basics down, you can try some cool stuff. Peanut butter ganache does not just have to be a thick cream. You can change its physical state to fit different desserts. These techniques will make you look like a pastry chef. They are fun to try and very impressive.
Whipped Peanut Butter Ganache

Whipped peanut butter ganache is a light, airy alternative to the standard version, resembling a mix between mousse and frosting. This fluffy topping is perfect for decorating cakes or filling delicate pastries. You can easily achieve this heavenly texture by using a mixer to incorporate air into the chilled base.
- Light Texture. Whipping air into the base creates a fluffy frosting.
- Mixing Method. Use a hand or stand mixer on medium-high speed for a few minutes.
- Warning. Do not over-whip or it will become grainy and split.
Use as a Cake Drip
The “drip” look is very popular on Instagram and at bakeries. You can achieve this easily with your peanut butter ganache. The key is the temperature of the ganache and the cake. If the cake is cold and the ganache is warm, it stops perfectly. It creates those beautiful long drops.
- Warm Fluid. Use the ganache while it is still slightly warm for the best flow.
- Test Drip. Always do a test drip on the back of the cake first.
- Perfect Run. The cold cake will set the warm drip as it runs down the side.
Creative Ways to Use Peanut Butter Ganache
There are so many ways to use this stuff. You are only limited by your own imagination. It is one of those recipes that you will keep in your back pocket. From small cookies to big tiered cakes, it does it all. Here are some of the best ways to show it off.

As a Filling
Filling things with peanut butter ganache is a great surprise for anyone. When they bite in, they get a burst of creamy flavor. It adds a layer of luxury to even the simplest treats. It makes your baking feel much more professional and thoughtful.
- Macarons. Let the filled shells mature overnight for the best chewy texture.
- Cupcakes. Core the center and fill it for a delicious hidden surprise.
- Cookie Sandwiches. Use the ganache to bond two cookies together for a snack.
As a Coating or Frosting
You can also use it on the outside of your treats. It provides a clean and beautiful finish. It is often more stable than traditional buttercream in some conditions. Plus, the flavor is much more intense. It is a great way to seal in moisture too.
- Cake Layers. Use it as a stable filling between large cake layers.
- Fondant Base. It can be used as a firm mask under fondant if kept chilled.
- Pastry Glaze. Dip éclairs or cream puffs for a glossy, professional-looking glaze.
Storage and Make-Ahead Instructions
Baking can be stressful, so making things ahead of time helps. Peanut butter ganache stores really well. You can make a big batch and use it throughout the week. Knowing how to store it safely is very important for food safety. Here is the best way to keep it fresh.
Refrigeration and Longevity
The fridge is the safest place for your ganache. Since it has cream, you cannot leave it out on the counter forever. It stays fresh for quite a while if sealed properly. This makes it perfect for busy baking schedules. You can just grab it and go.
- Airtight Containers. Always store in a sealed container to keep smells out.
- One Week. The ganache stays fresh in the fridge for up to seven days.
- Dessert Limit. Filled desserts should be eaten within five days for best taste.
Freezing Guidelines

If you have a lot of leftovers, you can freeze it. Freezing is a great way to prevent waste. It does not change the flavor or texture much if you do it right. You just need to thaw it slowly when you are ready to use it again.
- One Month. You can freeze the ganache or filled desserts for up to 30 days.
- Proper Thawing. Let it thaw in the fridge overnight before trying to use it.
- Texture Maintenance. Give it a good stir once thawed to bring back the shine.
Conclusion and Final Thoughts
Peanut butter ganache is truly one of the best tools in a baker’s kit. It is simple to make but has a massive impact on your desserts. You only need three ingredients and a few minutes to create something amazing. It is the perfect mix of creamy, salty, and sweet.
Don’t be afraid to experiment with different types of peanut butter or chocolate. Every brand has a slightly different flavor. You can find the exact combo that your family loves most. Remember that quality ingredients always lead to the best results in the end.
Now you have all the tips, tricks, and steps to succeed. Whether you are filling macarons or making a drip cake, you’ve got this. Go grab your chocolate and get started. Your most delicious baking project is just a few minutes away.
Frequently Asked Questions about Peanut Butter Ganache
Can I make peanut butter ganache with crunchy peanut butter?
Yes, you can definitely use crunchy peanut butter if you want extra texture. This is great for filling cupcakes or brownies where a little crunch adds to the experience. However, avoid using crunchy versions if you plan to use the ganache as a smooth cake drip. The nut pieces will clog your piping tip or make the drips look lumpy.
What should I do if my ganache looks grainy?
A grainy texture usually means the chocolate was overheated or the emulsion broke. To fix this, try adding a tablespoon of room temperature heavy cream and whisking vigorously. If that doesn’t work, use an immersion blender to force the fats back together. Be careful not to overwork it, or you might incorporate too much air.
Can I use white chocolate chips instead of baking bars?
White chocolate chips contain stabilizers that help them keep their shape, so they don’t melt as smoothly as bars. If you must use chips, choose a high-quality brand with cocoa butter listed as a primary ingredient. Avoid “vanilla flavored chips” or “white morsels” as they often contain no real cocoa butter. These will result in a waxy texture that doesn’t set properly.
How do I color my peanut butter ganache?
Since this ganache is made with white chocolate, you can easily change its color using oil-based food coloring. Do not use water-based or gel colors, as they can cause the chocolate to seize and turn into a clump. Add a few drops of oil-based candy color after the mixture is smooth but before it sets.
Is it possible to make this recipe with almond butter or cashew butter?
You can swap the peanut butter for almost any nut or seed butter using a 1:1 ratio. Almond butter provides a more subtle, toasted flavor, while cashew butter makes it even creamier. Just ensure the alternative butter is well-mixed and not too oily before adding it to your chocolate.
Why did my peanut butter ganache turn out too thin?
If your ganache is runny even after several hours in the fridge, the ratio of liquid to chocolate might be off. This often happens if the heavy cream wasn’t measured accurately. To fix it, melt a small amount of extra white chocolate and whisk it into the existing mixture.
Can I use this ganache as a fruit dip?
This recipe makes an incredible dip for apples, pretzels, or strawberries. For a dipping consistency, use the ganache while it is at room temperature rather than chilled. If it has already set in the fridge, microwave it in 5-second bursts until it reaches a dipable state.
How can I make the peanut butter flavor more intense?
If you want a punchy peanut flavor, add a pinch of sea salt and a teaspoon of peanut flour to the mix. The salt enhances the savory notes of the nuts. You can also use a dark-roasted peanut butter, which has a much stronger aroma than standard creamy versions.
Can I add extracts like vanilla or caramel to the ganache?
Adding a teaspoon of vanilla extract or a bit of salt-caramel sauce can add great depth. Add these liquid flavorings at the very end of the mixing process. This ensures the heat doesn’t dull the flavor of the extracts.
Will peanut butter ganache melt off my cake in hot weather?
Ganache is more stable than buttercream, but it will still soften in high heat. If you are serving a cake outdoors in the summer, keep it refrigerated until the last possible moment. You can also increase the ratio of white chocolate to cream to make a firmer “stiff” ganache.
Can I use half-and-half instead of heavy whipping cream?
It is not recommended to use half-and-half because it lacks the necessary fat content to stabilize the chocolate. Your ganache will likely remain a liquid and never set firmly enough to pipe. Stick to heavy cream with at least 33% fat for the best results.
How do I fix ganache that has separated and looks oily?
Oil on the surface means the fat has pulled away from the solids. This usually happens if the cream was too hot when poured. You can fix this by whisking in a very small amount of cold milk or cream, one teaspoon at a time, until the mixture becomes smooth again.
Can I use a hand mixer to make the ganache?
You should use a whisk or a spoon for the initial melting phase to avoid adding air bubbles. Only use a hand mixer if you are purposefully making “whipped ganache” after the mixture has already chilled and set. Mixing too early with a machine can ruin the glossy finish.
How long can I keep the ganache at room temperature?
Once the ganache is on a cake or inside a pastry, it is generally safe at room temperature for up to two days, provided the room isn’t too hot. For long-term storage, always keep it in the refrigerator. The high sugar and fat content help preserve it, but the dairy still requires care.
Can I reheat the ganache that has already set?
Yes, you can reheat it if you need to return it to a liquid state for drizzling. Use a double boiler or the microwave on 10% power. Stir frequently to ensure it heats evenly and doesn’t burn at the edges.
What is the best way to fill macarons with this ganache?
Wait until the ganache is completely chilled and has the consistency of toothpaste. Transfer it to a piping bag and pipe a small mound onto the flat side of one macaron shell. Press a second shell on top until the ganache reaches the edges.
Can I use this as a base for truffles?
To make peanut butter ganache truffles, increase the amount of white chocolate significantly so the mixture becomes very firm. Once chilled, scoop out small balls and roll them in cocoa powder or crushed peanuts. They make for a very decadent gift.
Why is my white chocolate not melting in the hot cream?
If the white chocolate stays in lumps, it may be because the pieces were too large or the cream wasn’t hot enough. You can gently heat the whole bowl over a pot of simmering water (a bain-marie) while stirring. This will provide steady, gentle heat to melt the remaining bits.
Can I add honey or maple syrup to the recipe?
Adding liquid sweeteners can change the chemistry and make the ganache sticky rather than creamy. If you want a honey-peanut flavor, it is better to use a peanut butter that already has honey mixed in. This maintains the correct ratio of fat to moisture.
Does the brand of peanut butter really matter?
Commercial brands like Jif or Skippy are highly recommended for beginners because they contain stabilizers. These stabilizers help prevent the ganache from “breaking” or becoming oily. Natural brands that require stirring are delicious but can be more temperamental to work with.