Skip to content
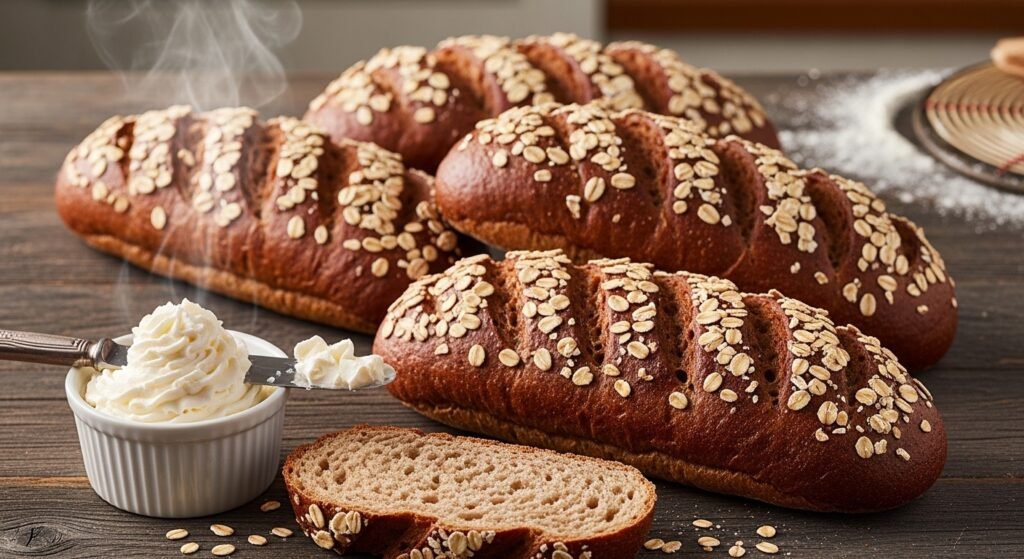
Looking for that legendary Cheesecake Factory brown bread? You know the one. This dark, soft, and slightly sweet bread arrives warm in a small basket. It is the ultimate comfort food for any meal.Many people call it their favorite part of the meal. This cheesecake bread recipe is your ticket to bakery bliss. You can skip the long lines at the mall. You can make this famous loaf in your own kitchen. It smells amazing while it bakes. Your whole house will smell like a cozy bakery. This guide shows you every single step. We will cover the ingredients and the secret steam trick. You will be a bread master in no time. Let’s get baking!
Introduction to the Famous Brown Bread
The Cheesecake Factory is famous for its massive menu, but the signature brown bread is the true star. This complimentary starter features a unique, malty flavor created by a blend of molasses and honey. It offers a perfect balance that tastes both earthy and slightly sweet without being a dessert. Since it is a key part of the restaurant experience, many fans love recreating it at home. You can now bring this warm, rich loaf directly to your own dinner table.
The texture of this bread is very specific. This bread has a soft center and a slightly chewy crust, much like West Coast Squaw bread. It also tastes very similar to the famous honey wheat bread served at Outback Steakhouse. Both use honey and wheat to get that signature feel. Our cheesecake bread recipe captures that exact soft texture. It is the perfect thing to slather with salted butter. Once you take a bite of a warm slice, you will be hooked. It really is a love language for bread lovers.
Understanding the Ingredients
- Warm water is the starting point for the dough. You need exactly 1-1/4 cup of water. Make sure it is warm but not hot to the touch.
- Instant dry yeast makes the bread rise up tall. You will need 2-1/4 tsp of yeast for this recipe. This is usually one standard packet.
- Granulated sugar is added to help the yeast grow. Only 1 tsp of sugar is needed for the proofing stage.
- Bread flour provides the structure and chewiness. Start with 1-3/4 cups and keep an extra 1/4 cup nearby.
- Whole wheat flour gives the bread its hearty grain flavor. You need 1-3/4 cup of this flour to get the right nutrition and taste.
- Honey adds a natural floral sweetness to the loaf. Use 1/4 cup of your favorite honey.
- Molasses is the key to that deep malty flavor. Add 3 Tbsp of molasses to the mix.
- Brown sugar helps with moisture and adds a hint of caramel. Use 1 Tbsp of packed brown sugar.
- Cocoa powder provides the dark color without being too sweet. You need 1-1/2 Tbsp of unsweetened cocoa powder.
- Salt is vital for the flavor and the yeast. Use 1 tsp of salt to balance the sweetness.
- Canola oil keeps the bread soft and tender. You need 3 Tbsp of oil for the dough.
- White cornmeal is used for the bottom of the pan. Use 1/2 Tbsp to keep the loaves from sticking.
- Rolled oats are the classic garnish for the top. Sprinkle these on right before the final rise.
Essential Kitchen Equipment
- Mixing bowls are needed for the yeast and the dry ingredients. A large bowl works best for the main dough.
- Stand mixer makes the kneading process much easier. Ensure you have a dough hook attachment ready.
- Measuring tools are required for precision. Use liquid cups for water and dry cups for flour.
- Pastry mat provides a clean surface for shaping the logs. A floured countertop also works well.
- French bread pan helps the loaves keep their round shape. You can also use a regular flat baking sheet.
- Sharp knife is essential for scoring the top of the bread. A very sharp blade prevents tearing the dough.
- Parchment paper makes cleanup easy and prevents sticking. Line your baking sheet with a piece of this paper.
- Cooling rack allows air to flow around the finished bread. This prevents the bottom from getting soggy.
Step-by-Step Preparation and Mixing
Proofing the Yeast
First, grab a small bowl for the yeast mixture. Combine the warm water, yeast, and the small bit of sugar. Give it a quick stir to combine everything. Now, you just have to wait for a bit. Let it sit for about 3 to 5 minutes. You are looking for it to become frothy and bubbly. This means the yeast is alive and working. If it stays flat, your water might have been too hot. Or perhaps your yeast was just too old. Always check the expiration date on your yeast packets.
Combining Dry and Wet Ingredients
Next, take your large mixing bowl for the dry stuff. Whisk together the flours, brown sugar, cocoa powder, and salt. Make sure there are no large lumps of cocoa or sugar. Once that is done, add the yeast mixture to the bowl. Pour in the oil, honey, and the molasses as well. These wet ingredients will start to smell great immediately. The molasses and honey give it a very rich aroma. You are now ready to start the mixing process.
The Kneading Process

If you have a mixer, use the dough hook. Mix on medium-low speed for about 5 minutes. If you are doing this by hand, it takes longer. Expect to knead for about 10 to 12 minutes manually. You want the dough to come together into a smooth ball. It should feel tacky to the touch but not wet. If it sticks to your fingers, add a little extra flour. Do this only one tablespoon at a time so you don’t overdo it. The dough is ready when it pulls away from the sides.
The Science of the Rise
The First Proofing
Now it is time for the dough to rest. Lightly grease the inside of a bowl with spray. Place your dough ball inside and cover it up. Put the bowl in a warm, draft-free spot in your kitchen. It needs to rise for 1 to 1-1/2 hours. During this time, the yeast eats the sugars. This creates gas that makes the dough grow. You want the dough to double in its size. This first rise is where the flavor really develops. Be patient and give it the full time it needs.
The Second Proofing
After the first rise, you have to shape the loaves. Once they are shaped, they need to rest again. Place the shaped logs on your prepared baking sheet. Cover them loosely with a clean kitchen towel. Let them sit for another 30 to 40 minutes. They should puff up and almost double again. This second rise makes the bread light and airy. If you skip this, your bread will be very heavy. A warm kitchen helps this process go faster.
Shaping the Signature Loaves

Take your risen dough and gently punch it down. This gets rid of any big air pockets. Divide the dough into four equal pieces for small loaves. You can use a kitchen scale to be exact. Roll each piece out into a small rectangle shape. Then, roll it up tightly like a sleeping bag. Pinch the seams and the ends to seal them. Use your hands to roll them into 8 or 9-inch logs. This shape is the classic look of the cheesecake bread recipe.
Prepare your baking pan by lining it with parchment. Sprinkle the white cornmeal over the parchment paper. This cornmeal adds a nice crunch to the bottom. It also helps the bread slide right off the pan. Place your logs on the pan with space between them. They will expand as they rise and bake. You don’t want them sticking together in the oven. Now your loaves are ready for the finishing touches.
Professional Finishing Techniques
Scoring the Bread
Scoring is just a fancy word for cutting the dough. Take a very sharp knife and make cuts on top. You should make 3 or 4 diagonal slashes per loaf. These cuts are not just for looks. They allow the bread to expand without bursting. It gives the steam a place to escape while baking. Make the cuts about half an inch deep. If your knife is dull, it might pull the dough. Try to use a swift and steady motion for clean lines.
The Oat Garnish

The oats are what make this bread look professional. First, brush the top of each loaf with warm water. This acts like a glue for the toppings. While the dough is damp, sprinkle on the rolled oats. Press them down very lightly so they stay put. The oats will toast slightly in the oven for extra flavor. They provide a nice contrast to the dark, soft bread. This step makes your homemade loaves look exactly like the restaurant version.
Masterclass in Baking and Steam
Setting Up the Oven
Preheat your oven to 350 degrees before you start. You need to set up two racks for the best results. Put one rack in the middle and one at the bottom. The middle rack is where the bread pan will go. The bottom rack is for the special steam pan. Take an extra empty baking sheet and put it on that bottom rack. Let the oven get fully up to temperature. A hot oven is key for a good rise.
The Ice Cube Trick

Steam is the secret to great baguette-style bread. Once you put the bread in, work very quickly. Open the door and toss 4 or 5 ice cubes onto the bottom pan. Close the oven door immediately to trap the steam. The steam keeps the outside of the dough soft for longer. This allows the bread to rise more before the crust sets. It also helps create that signature chewy exterior we love. This simple trick makes a world of difference in your baking.
Timing and Doneness
Bake the loaves for about 25 to 30 minutes. Your kitchen will start to smell incredible after 15 minutes. Check them toward the end of the baking time. They should look dark brown and feel firm. If you have a thermometer, check the inside temperature. It should reach 190 degrees when it is fully done. Take the pan out and let the bread cool slightly. Do not cut it immediately or it will flatten. Wait about 10 minutes before serving.
Troubleshooting Common Issues
Why is my bread too dense?
- Too much flour is the most common reason for heavy bread. Always spoon the flour into the cup instead of scooping.
- Dead yeast will prevent the bread from rising at all. Always check for bubbles during the proofing stage.
- Cold kitchen temperatures can slow down the rising process significantly. Try putting the dough in an oven that is turned off but has the light on.
- Short rise times mean the yeast didn’t have enough time to work. Ensure the dough has truly doubled in size before moving on.
Solving Texture and Shape Problems
If your loaves are flat, you might need more tension. When you roll the logs, make sure they are tight. This helps the bread grow “up” instead of “out.” If the dough is too sticky to handle, use floured hands. Don’t be afraid to add that extra bit of bread flour. The type of flour you use matters too. Bread flour has more protein than all-purpose flour. This extra protein gives the bread its strength and height. If you use all-purpose, the bread might be a bit softer and shorter.
Recipe Variations and Adaptations
Different Fat Sources
You can change the oil based on what you have. Canola oil is neutral and works perfectly. Vegetable oil is a very easy swap with no issues. If you want a richer taste, try avocado oil. It adds a slightly buttery note to the bread. Some people even use melted coconut oil for a unique twist. Each of these will keep the bread moist and delicious. Avoid using oils with very strong flavors like extra virgin olive oil.
Alternate Shapes
You don’t have to make long baguette logs. This cheesecake bread recipe works great as dinner rolls too. Just divide the dough into 12 small balls instead of 4 logs. If you do this, reduce the baking time by about 10 minutes. You can also bake the whole batch in two standard loaf pans. This creates a more traditional sandwich bread shape. No matter the shape, the flavor will still be amazing. Just keep an eye on the oven as smaller shapes bake faster.
Machine Methods
Can you use a bread machine for this? Yes, you can definitely use the dough setting. Add the liquids first, then the dry ingredients on top. Let the machine do the mixing and the first rise. Once it is done, take the dough out and shape it by hand. Bread machines often have different pan sizes, so be careful. It is usually better to bake these in the oven for the best crust. The oven allows you to use the ice cube steam trick.
Serving and Storage Recommendations
The Perfect Accompaniment

This bread is best served warm with butter. You can use plain salted butter for the classic taste. For a fancy touch, whip the butter until it is fluffy. You can also make honey butter by mixing honey into softened butter. Some people like to add a pinch of cinnamon for extra warmth. The sweetness of the bread pairs perfectly with salty toppings. It is a great side for steak, pasta, or even salad. It is hard to stop at just one slice.
Storage Tips
- Room temperature storage is fine for about 2 or 3 days. Keep the bread in a sealed plastic bag to stay soft.
- Avoid the fridge as it can actually make bread go stale faster. The cold air draws out the moisture.
- Freezing is a great option if you make a big batch. Wrap each loaf tightly in foil and then a freezer bag.
- Reheating in the oven is the best way to enjoy leftovers. Wrap in foil and bake at 350 for 10 minutes to refresh.
Enjoy making your very own batch of this famous treat! This cheesecake bread recipe is sure to be a hit with your family. It is fun to make and even better to eat. Happy baking!
Frequently Asked Questions
Can I use all-purpose flour instead of bread flour for this cheesecake bread recipe?
You can use all-purpose flour if you do not have bread flour. However, the texture will be slightly different. Bread flour contains more protein which helps the bread rise higher. All-purpose flour will result in a softer and slightly denser loaf.
Is it possible to make this dough in a food processor?
Yes, you can use a food processor with a dough blade. Pulse the ingredients until a ball forms and then process for about 45 seconds. Be careful not to overheat the motor. The friction from the blades can warm the dough very quickly.
Why did my oats fall off the bread after baking?
Oats usually fall off because the dough surface was too dry. You must brush the loaves generously with warm water or an egg wash. Press the oats lightly into the surface while the dough is still damp. This ensures they stick during the expansion in the oven.
How do I make the bread crust even softer?
If you prefer a very soft crust, skip the ice cube steam trick. Instead, brush the loaves with melted butter immediately after taking them out of the oven. Covering the warm bread with a clean towel also traps steam. This prevents the crust from hardening as it cools.
Can I substitute the honey with maple syrup?
Maple syrup is a great substitute for honey in this cheesecake bread recipe. It provides a similar level of sweetness and moisture. The flavor profile will change slightly to a more woody sweetness. Keep the measurement the exact same as the honey.
What is the best way to slice this bread without squishing it?
Wait at least 15 to 20 minutes for the bread to cool down. Use a high-quality serrated bread knife with a sawing motion. Do not press down hard on the loaf while cutting. Let the teeth of the knife do the work for you.
Can I add raisins or nuts to this recipe?
You can definitely add about half a cup of raisins or chopped walnuts. Add them during the last minute of the kneading process. This ensures they are evenly distributed without being crushed. It adds a nice texture and extra sweetness to the final product.
Why is my bread dough not rising in the bowl?
The most common cause is the temperature of your kitchen. If it is below 70 degrees, the yeast works very slowly. Try placing the bowl in a microwave with a cup of hot water. The steam and trapped heat create a perfect proofing environment.
Can I make the dough ahead of time and bake it later?
You can let the first rise happen in the refrigerator overnight. This is called a cold ferment and actually improves the flavor. Simply punch the dough down the next morning and shape it. Allow it to come to room temperature before the final rise.
Is blackstrap molasses too strong for this bread?
Blackstrap molasses has a very intense and slightly bitter flavor. It is better to use light or “unsulphured” molasses for this specific bread. If you only have blackstrap, use half the amount and supplement with honey. This keeps the flavor from becoming too overwhelming.
How do I get a perfectly round shape for my logs?
When rolling the dough into a rectangle, try to keep the edges even. Roll the dough tightly while pulling back slightly to create tension. Pinch the long seam and the ends very firmly. Tension on the outer “skin” of the dough helps it hold a round shape.
Can I use a Dutch oven for this cheesecake bread recipe?
You can bake this as a large round loaf in a preheated Dutch oven. This method creates a very thick and crispy crust. Score the top with a large “X” to allow for expansion. You will likely need to increase the baking time to 40 minutes.
What happens if I forget to add the cocoa powder?
The bread will still taste delicious but it will be much lighter in color. The cocoa powder is primarily used as a natural dye. It does not significantly change the chemistry of the bread. Your loaves will look more like standard wheat bread.
Can I use milk instead of water for the liquid?
Replacing water with milk will make the bread richer and more tender. The sugars in the milk will also help the crust brown more deeply. Ensure the milk is warmed to about 105 degrees before adding the yeast. This creates a more “brioche-like” version of the bread.
How can I tell if my yeast is still good?
Mix a small amount of yeast with warm water and a pinch of sugar. If it does not foam up within ten minutes, the yeast is dead. Throw it away and buy a fresh jar. Using dead yeast is the number one reason for baking failures.
Why does the recipe call for cornmeal on the pan?
Cornmeal prevents the dough from sticking to the parchment paper or baking sheet. It also mimics the bottom texture of professional restaurant bread. It provides a nice toasted flavor and a bit of crunch. If you dislike cornmeal, you can use extra flour instead.
Can I make this recipe gluten-free?
Bread involves a lot of gluten for its specific structure and chew. You would need a high-quality gluten-free bread flour blend with xanthan gum. The results will be different in texture but the flavors can still be replicated. Follow a specific gluten-free proofing schedule for best results.
Does the salt level affect the rising of the bread?
Yes, salt actually slows down the yeast. Never pour the salt directly onto the yeast in the water. Always mix the salt into the dry flour first. This ensures the yeast has a chance to activate before the salt regulates its growth.
Can I use this dough to make breadsticks?
This dough makes excellent, soft breadsticks. Roll the dough into thin strips and bake for only 12 to 15 minutes. Brush them with garlic butter immediately after baking. They are a fantastic appetizer for any Italian-style dinner.
How should I store the bread if I live in a humid climate?
In humid areas, bread can grow mold very quickly at room temperature. It is best to slice the bread and freeze it immediately after it cools. Take out only the slices you need and toast them. This keeps the bread tasting fresh for weeks.